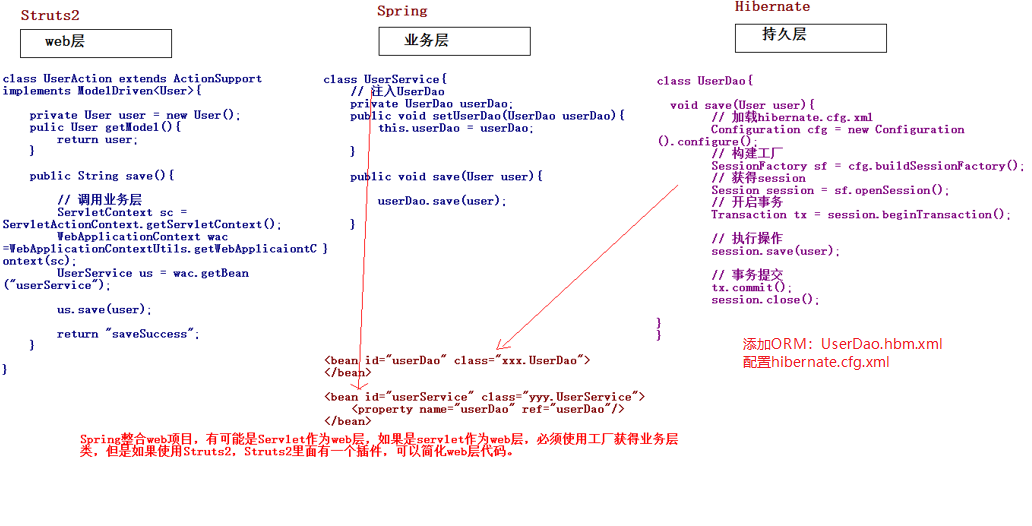
一、SSH整合回顾
二、创建项目引入jar包
1.Struts2 jar包

2.Hibernate jar包

3.Spring jar包

注意:日志jar包可以去掉一些。也可以不去。不要忘了连接数据库的jar包

三、引入配置文件
1.Struts2
(1)web.xml
配置核心过滤器
<!-- 配置Struts2的核心过滤器 -->
<filter>
<filter-name>struts2</filter-name>
<filter-class>org.apache.struts2.dispatcher.ng.filter.StrutsPrepareAndExecuteFilter</filter-class>
</filter>

<filter-mapping>
<filter-name>struts2</filter-name>
<url-pattern>/*</url-pattern>
</filter-mapping>
(2)struts.xml
配置action映射
<?xml version="1.0" encoding="UTF-8" ?>
<!DOCTYPE struts PUBLIC
"-//Apache Software Foundation//DTD Struts Configuration 2.3//EN"
"http://struts.apache.org/dtds/struts-2.3.dtd">
<struts>

</struts>
####2.Hibernate
(1)hibernate.cfg.xml
去掉与线程绑定的session,以及事务隔离级别,这个都交给spring做。
<?xml version="1.0" encoding="UTF-8"?>
<!DOCTYPE hibernate-configuration PUBLIC
"-//Hibernate/Hibernate Configuration DTD 3.0//EN"
"http://www.hibernate.org/dtd/hibernate-configuration-3.0.dtd">

<hibernate-configuration>
<session-factory>
<!-- 建立数据库连接的基本参数 -->
<property name="hibernate.connection.driver_class">com.mysql.jdbc.Driver</property>
<property name="hibernate.connection.url">jdbc:mysql:///hibernate</property>
<property name="hibernate.connection.username">root</property>
<property name="hibernate.connection.password">19960213zx</property>
<!-- 配置hibernate的方言 -->
<property name="hibernate.dialect">org.hibernate.dialect.MySQLDialect</property>
<!-- 配置C3P0连接池 -->
    <property name="connection.provider_class">org.hibernate.connection.C3P0ConnectionProvider</property>
    <!--在连接池中可用的数据库连接的最少数目 -->
    <property name="c3p0.min_size">5</property>
    <!--在连接池中所有数据库连接的最大数目  -->
    <property name="c3p0.max_size">20</property>
    <!--设定数据库连接的过期时间,以秒为单位,
    如果连接池中的某个数据库连接处于空闲状态的时间超过了timeout时间,就会从连接池中清除 -->
    <property name="c3p0.timeout">120</property>
     <!--每3000秒检查所有连接池中的空闲连接 以秒为单位-->
    <property name="c3p0.idle_test_period">3000</property>

<!-- 可选配置 -->
<!-- 打印SQL -->
<property name="hibernate.show_sql">true</property>
<!-- 格式化SQL -->
<property name="hibernate.format_sql">true</property>

</session-factory>
</hibernate-configuration>
(2)ORM映射文件
具体对象具体映射
3.Spring
(1)web.xml
配置监听器,防止每次创建工厂
<!-- Spring的核心监听器 -->
  <listener>
  <listener-class>org.springframework.web.context.ContextLoaderListener</listener-class>
  </listener>

  <!-- 加载Spring的配置文件的路径的,默认加载的/WEB-INF/applicationContext.xml -->
  <context-param>
  <param-name>contextConfigLocation</param-name>
  <param-value>classpath:applicationContext.xml</param-value>
  </context-param>
(2)applicationContext.xml
<?xml version="1.0" encoding="UTF-8"?>
<beans xmlns="http://www.springframework.org/schema/beans"
xmlns:xsi="http://www.w3.org/2001/XMLSchema-instance"
xmlns:context="http://www.springframework.org/schema/context"
xmlns:aop="http://www.springframework.org/schema/aop"
xmlns:tx="http://www.springframework.org/schema/tx"
xsi:schemaLocation="http://www.springframework.org/schema/beans
http://www.springframework.org/schema/beans/spring-beans.xsd
http://www.springframework.org/schema/context
http://www.springframework.org/schema/context/spring-context.xsd
http://www.springframework.org/schema/aop
http://www.springframework.org/schema/aop/spring-aop.xsd
http://www.springframework.org/schema/tx
http://www.springframework.org/schema/tx/spring-tx.xsd">


</beans>
(3)日志记录
log4j.properties
### direct log messages to stdout ###
log4j.appender.stdout=org.apache.log4j.ConsoleAppender
log4j.appender.stdout.Target=System.err
log4j.appender.stdout.layout=org.apache.log4j.PatternLayout
log4j.appender.stdout.layout.ConversionPattern=%d{ABSOLUTE} %5p %c{1}:%L - %m%n

### direct messages to file mylog.log ###
log4j.appender.file=org.apache.log4j.FileAppender
log4j.appender.file.File=c\:mylog.log
log4j.appender.file.layout=org.apache.log4j.PatternLayout
log4j.appender.file.layout.ConversionPattern=%d{ABSOLUTE} %5p %c{1}:%L - %m%n

### set log levels - for more verbose logging change 'info' to 'debug' ###
# error warn info debug trace
log4j.rootLogger= info, stdout
四、创建包结构及相关类
没有utils是因为spring实现了工具类的封装
五、Spring整合struts2
(0)传统方式在web层不用struts2来获取service方法(spring下)
在相应的web层方法中写如下代码:
//保存客户的方法
public String save() {
    //传统方法:web层没有使用struts的话,就用这种方式调用service层的方法
    WebApplicationContext applicationContext=WebApplicationContextUtils.
            getWebApplicationContext(ServletActionContext.getServletContext());
    CustomerService customerService=(CustomerService)applicationContext.
            getBean("customerService");//获取的是配置文件中的id=customerService
    customerService.save(customer);
    System.out.println("Actionsave");
    return NONE;
}
(1)Action由Struts2自己创建
①.配置struts.xml
<package name="ssh01" extends="struts-default" namespace="/">
<action name="customer_*" class="pers.zx.ssh.web.CustomerWeb" method="{1}">

</action>
②.在applicationContext.xml中配置service
<!-- 配置service -->
<bean id="customerService" class="pers.zx.ssh.service.impl.CustomerServiceImpl">

</bean>
③.编写action类
public class CustomerWeb extends ActionSupport implements ModelDriven<Customer>{

//会获取页面的值
private Customer customer=new Customer();
public Customer getModel() {
    // TODO Auto-generated method stub
    return customer;
}

//注入customerService
private CustomerService customerService;

public void setCustomerService(CustomerService customerService) {
    this.customerService = customerService;
}

//保存客户的方法
public String save() {
    //spring与struts整合
    customerService.save(customer);
    System.out.println("Actionsave");
    return NONE;
}

}
(2)Action交给Spring管理
①.引入struts-spring-plugin.jar
②.配置spring配置文件
管理action类,并在该类中注入service,注意设置Action类为多例的
③.配置sturts.xml
将class换成applicationContext.xml中管理的Action类的id
六、spring整合hibernate
1.带hibernate.cfg.xml的
(1)service调用dao
把dao交给spring,然后在service中注入dao,注入dao就是在service中编写对象及其set方法,并在applicationContext.xml中注入
①.applicationContext.xml
<!-- 配置dao -->
<bean id="customerDao" class="pers.zx.ssh.dao.impl.CustomerDaoImpl">

</bean>
<!-- 配置service -->
<bean id="customerService" class="pers.zx.ssh.service.impl.CustomerServiceImpl">
<property name="customerDao" ref="customerDao"></property>
</bean>
②.service类中的注入
 //注入dao
private CustomerDao customerDao;

public void setCustomerDao(CustomerDao customerDao) {
    this.customerDao = customerDao;
}

public void save(Customer customer) {
    // TODO Auto-generated method stub
    customerDao.save(customer);
    System.out.println("service");

}
(2)具体整合
①.创建表
②.编写实体和映射Customer.hbm.xml
③.spring与hibernate的整合
④.配置spring事务管理
2.不带hibernate.cfg.xml的
去掉hibernate.cfg.xml,将其中的内容写道applicationContext.xml中,由于用到c3p0连接池,为了方便配置,引入外部配置文件jdbc.properties
applicationContext.xml
<?xml version="1.0" encoding="UTF-8"?>
<beans xmlns="http://www.springframework.org/schema/beans"
xmlns:xsi="http://www.w3.org/2001/XMLSchema-instance"
xmlns:context="http://www.springframework.org/schema/context"
xmlns:aop="http://www.springframework.org/schema/aop"
xmlns:tx="http://www.springframework.org/schema/tx"
xsi:schemaLocation="http://www.springframework.org/schema/beans
http://www.springframework.org/schema/beans/spring-beans.xsd
http://www.springframework.org/schema/context
http://www.springframework.org/schema/context/spring-context.xsd
http://www.springframework.org/schema/aop
http://www.springframework.org/schema/aop/spring-aop.xsd
http://www.springframework.org/schema/tx
http://www.springframework.org/schema/tx/spring-tx.xsd">

<!-- 引入外部属性文件 -->
<context:property-placeholder location="classpath:jdbc.properties"/>
<!-- 配置C3P0连接池 -->
 <bean id="dataSource" class="com.mchange.v2.c3p0.ComboPooledDataSource">

<property name="driverClass" value="${jdbc.driverClass}"/>
<property name="jdbcUrl" value="${jdbc.url}"/>
<property name="user" value="${jdbc.username}"/>
<property name="password" value="${jdbc.password}"/>
</bean>
<!-- spring整合hibernate -->
<!-- 引入hibernate的配置信息 -->
<bean id="sessionFactory" class="org.springframework.orm.hibernate5.LocalSessionFactoryBean">
<!-- 注入连接池 -->
<property name="dataSource" ref="dataSource"/>
<!--配置Hibernate相关属性  -->
<property name="hibernateProperties">
<props>
<prop key="hibernate.dialect">org.hibernate.dialect.MySQLDialect</prop>
<prop key="hibernate.show_sql">true</prop>
<prop key="hibernate.format_sql">true</prop>
<prop key="hibernate.hbm2ddl.auto">update</prop>
</props>
</property>
<!-- 设置映射文件 -->
<property name="mappingResources">
<list>
<value>pers/zx/ssh/bean/Customer.hbm.xml</value>
</list>
</property>
</bean>
<!-- 配置action -->
<bean id="customerWeb" class="pers.zx.ssh.web.CustomerWeb" scope="prototype">
<property name="customerService" ref="customerService"/>
</bean>
<!-- 配置dao -->
<bean id="customerDao" class="pers.zx.ssh.dao.impl.CustomerDaoImpl">
<!-- 注入sessionFactory -->
<property name="sessionFactory" ref="sessionFactory"/>
</bean>
<!-- 配置service -->
<bean id="customerService" class="pers.zx.ssh.service.impl.CustomerServiceImpl">
<property name="customerDao" ref="customerDao"></property>
</bean>

<!-- 配置事务管理器 -->
<bean id="transactionManager" class="org.springframework.orm.hibernate5.HibernateTransactionManager">
    <property name="sessionFactory" ref="sessionFactory"/>
</bean>
<!-- 开启注解事务 -->
<tx:annotation-driven transaction-manager="transactionManager"/>


</beans>
3.Hibernate模板操作
1.保存操作
save(Object obj);
2.修改操作
update(Object obj);
3.删除操作
delete(Object obj);
4.查询操作
(1)查询一个
get(Class c,Serializable id);
load(Class c,Serializable id);
(2)查询多个
List find(String hql,Object… args);
List findByCriteria(DetachedCriteria dc);
List findByCriteria(DetachedCriteria dc,int firstResult,int maxResults);//分页查询
List findByNamedQuery(String name,Object… args);//命名查询
@Override
public void save(Customer customer) {
    System.out.println("DAO中的save方法执行了...");
    this.getHibernateTemplate().save(customer);
}

@Override
public void update(Customer customer) {
    this.getHibernateTemplate().update(customer);
}

@Override
public void delete(Customer customer) {
    this.getHibernateTemplate().delete(customer);
}

@Override
public Customer findById(Long cust_id) {
//        return this.getHibernateTemplate().get(Customer.class, cust_id);
    return this.getHibernateTemplate().load(Customer.class, cust_id);
}

@Override
public List<Customer> findAllByHQL() {
    List<Customer> list = (List<Customer>) this.getHibernateTemplate().find("from Customer");
    return list;
}

@Override
public List<Customer> findAllByQBC() {
    DetachedCriteria criteria = DetachedCriteria.forClass(Customer.class);
    List<Customer> list = (List<Customer>) this.getHibernateTemplate().findByCriteria(criteria);
    return list;
}

@Override
public List<Customer> findAllByNamedQuery() {
    return (List<Customer>) this.getHibernateTemplate().findByNamedQuery("queryAll");
}
七、解决延迟加载
延迟加载产生的原因:在查询对象的时候关联对象的信息会延迟加载。此时会报no-session异常。
解决方法:在web.xml中配置防止延迟加载的过滤器OpenSessionInViewFilter,它会在web层开启session
(注意:要把该过滤器加载struts过滤器前面,否则就没用了 ,因为其本身就是对action的过滤,若是action执行完了,就没效果了)
<!-- 解决延迟加载问题的过滤器 -->
  <filter>
  <filter-name>OpenSessionInViewFilter</filter-name>
  <filter-class>org.springframework.orm.hibernate5.support.OpenSessionInViewFilter</filter-class>
  </filter>

  <filter-mapping>
  <filter-name>OpenSessionInViewFilter</filter-name>
  <url-pattern>*.action</url-pattern>
  </filter-mapping>


