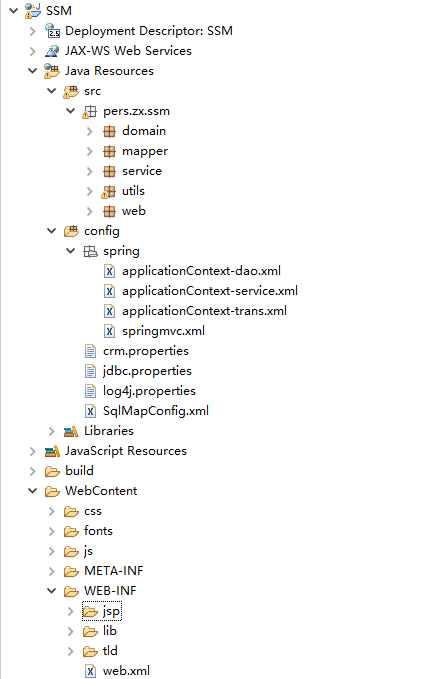
一、ssm工程架构
二、导入jar包

三、具体实现
1.创建实体对象
包含对象属性,及get\set方法
2.创建实体mapper接口和映射的xml(dao层)
mapper接口:里面是相应方法的声明
mapper.xml:配置映射接口,以及相应的实现语句
注意:映射为接口的全路径,而且里面方法的id为接口中方法的名称,入参类型为方法的参数类型,返回结果类型也是方法的返回结果类型。
3.创建service层
里面含有service接口和实现类,接口中声明相应的方法,接口实现类中实现这些方法,具体就是使用dao层的方法,来实现相应的操作。
4.创建web层
调用service层的方法,利用各种传参的方式把运行结果返回给页面。
5.配置文件
(1)SqlMapConfig.xml
<?xml version="1.0" encoding="UTF-8" ?>
<!DOCTYPE configuration PUBLIC "-//mybatis.org//DTD Config 3.0//EN"
"http://mybatis.org/dtd/mybatis-3-config.dtd">
<configuration>

</configuration>
是一个空的配置文件,但也必须有。
(2)applicationContext-dao.xml
<?xml version="1.0" encoding="UTF-8"?>
<beans xmlns="http://www.springframework.org/schema/beans"
xmlns:context="http://www.springframework.org/schema/context" xmlns:p="http://www.springframework.org/schema/p"
xmlns:aop="http://www.springframework.org/schema/aop" xmlns:tx="http://www.springframework.org/schema/tx"
xmlns:xsi="http://www.w3.org/2001/XMLSchema-instance"
xsi:schemaLocation="http://www.springframework.org/schema/beans http://www.springframework.org/schema/beans/spring-beans-4.0.xsd
http://www.springframework.org/schema/context http://www.springframework.org/schema/context/spring-context-4.0.xsd
http://www.springframework.org/schema/aop http://www.springframework.org/schema/aop/spring-aop-4.0.xsd http://www.springframework.org/schema/tx http://www.springframework.org/schema/tx/spring-tx-4.0.xsd
http://www.springframework.org/schema/util http://www.springframework.org/schema/util/spring-util-4.0.xsd">

<!-- 配置 读取properties文件 jdbc.properties -->
<context:property-placeholder location="classpath:jdbc.properties" />

<!-- 配置 数据源 -->
<bean id="dataSource" class="com.alibaba.druid.pool.DruidDataSource">
    <property name="driverClassName" value="${jdbc.driverClass}" />
    <property name="url" value="${jdbc.url}" />
    <property name="username" value="${jdbc.username}" />
    <property name="password" value="${jdbc.password}" />
</bean>

<!-- 配置SqlSessionFactory -->
<bean class="org.mybatis.spring.SqlSessionFactoryBean">
    <!-- 设置MyBatis核心配置文件 -->
    <property name="configLocation" value="classpath:SqlMapConfig.xml" />
    <!-- 设置数据源 -->
    <property name="dataSource" ref="dataSource" />
    <!-- 别名包扫描 -->
    <property name="typeAliasesPackage" value="pers.zx.ssm.domain" />
</bean>

<!-- 配置Mapper扫描 -->
<bean class="org.mybatis.spring.mapper.MapperScannerConfigurer">
    <!-- 设置Mapper扫描包 -->
    <property name="basePackage" value="pers.zx.ssm.mapper" />
</bean>
</beans>
配置和设置数据源,并且要类似于ssh那样注入dao,这里是配置扫描mapper。
(3)applicationContext-service.xml
<?xml version="1.0" encoding="UTF-8"?>
<beans xmlns="http://www.springframework.org/schema/beans"
xmlns:context="http://www.springframework.org/schema/context" xmlns:p="http://www.springframework.org/schema/p"
xmlns:aop="http://www.springframework.org/schema/aop" xmlns:tx="http://www.springframework.org/schema/tx"
xmlns:xsi="http://www.w3.org/2001/XMLSchema-instance"
xsi:schemaLocation="http://www.springframework.org/schema/beans http://www.springframework.org/schema/beans/spring-beans-4.0.xsd
http://www.springframework.org/schema/context http://www.springframework.org/schema/context/spring-context-4.0.xsd
http://www.springframework.org/schema/aop http://www.springframework.org/schema/aop/spring-aop-4.0.xsd http://www.springframework.org/schema/tx http://www.springframework.org/schema/tx/spring-tx-4.0.xsd
http://www.springframework.org/schema/util http://www.springframework.org/schema/util/spring-util-4.0.xsd">

<!-- 配置Service扫描 -->
<context:component-scan base-package="pers.zx.ssm.service" />
使用注解方式来注入。
(4)applicationCOntext-tran.xml
<?xml version="1.0" encoding="UTF-8"?>
<beans xmlns="http://www.springframework.org/schema/beans"
xmlns:context="http://www.springframework.org/schema/context" xmlns:p="http://www.springframework.org/schema/p"
xmlns:aop="http://www.springframework.org/schema/aop" xmlns:tx="http://www.springframework.org/schema/tx"
xmlns:xsi="http://www.w3.org/2001/XMLSchema-instance"
xsi:schemaLocation="http://www.springframework.org/schema/beans http://www.springframework.org/schema/beans/spring-beans-4.0.xsd
http://www.springframework.org/schema/context http://www.springframework.org/schema/context/spring-context-4.0.xsd
http://www.springframework.org/schema/aop http://www.springframework.org/schema/aop/spring-aop-4.0.xsd http://www.springframework.org/schema/tx http://www.springframework.org/schema/tx/spring-tx-4.0.xsd
http://www.springframework.org/schema/util http://www.springframework.org/schema/util/spring-util-4.0.xsd">

<!-- 事务管理器 -->
<bean id="transactionManager" class="org.springframework.jdbc.datasource.DataSourceTransactionManager">
    <!-- 数据源 -->
    <property name="dataSource" ref="dataSource" />
</bean>

<!-- 通知 -->
<tx:advice id="txAdvice" transaction-manager="transactionManager">
    <tx:attributes>
        <!-- 传播行为 -->
        <tx:method name="save*" propagation="REQUIRED" />
        <tx:method name="insert*" propagation="REQUIRED" />
        <tx:method name="add*" propagation="REQUIRED" />
        <tx:method name="create*" propagation="REQUIRED" />
        <tx:method name="delete*" propagation="REQUIRED" />
        <tx:method name="update*" propagation="REQUIRED" />
        <tx:method name="find*" propagation="SUPPORTS" read-only="true" />
        <tx:method name="select*" propagation="SUPPORTS" read-only="true" />
        <tx:method name="get*" propagation="SUPPORTS" read-only="true" />
        <tx:method name="query*" propagation="SUPPORTS" read-only="true" />
    </tx:attributes>
</tx:advice>

<!-- 切面 -->
<aop:config>
    <aop:advisor advice-ref="txAdvice"
        pointcut="execution(* pers.zx.ssm.service.*.*(..))" />
</aop:config>

</beans>
进行事务管理,这里不和service写在一起是应为分开更好管理。不同的配置文件的属性也可以共享。比如这里注入dataSource
(5)springmvc.xml
<?xml version="1.0" encoding="UTF-8"?>
<beans xmlns="http://www.springframework.org/schema/beans"
xmlns:xsi="http://www.w3.org/2001/XMLSchema-instance" xmlns:p="http://www.springframework.org/schema/p"
xmlns:context="http://www.springframework.org/schema/context"
xmlns:mvc="http://www.springframework.org/schema/mvc"
xsi:schemaLocation="http://www.springframework.org/schema/beans http://www.springframework.org/schema/beans/spring-beans-4.0.xsd
    http://www.springframework.org/schema/mvc http://www.springframework.org/schema/mvc/spring-mvc-4.0.xsd
    http://www.springframework.org/schema/context http://www.springframework.org/schema/context/spring-context-4.0.xsd">
<!-- 配置Controller扫描 -->
<context:component-scan base-package="pers.zx.ssm.web" />
<!-- 属性文件的加载 -->
<context:property-placeholder location="classpath:crm.properties"/>

<!-- 配置注解驱动 -->
<mvc:annotation-driven />
<!-- 解决静态资源无法被springmvc处理 -->
<!-- 配置视图解析器 -->
<bean    class="org.springframework.web.servlet.view.InternalResourceViewResolver">
    <!-- 前缀 -->
    <property name="prefix" value="/WEB-INF/jsp/" />
    <!-- 后缀 -->
    <property name="suffix" value=".jsp" />
</bean>


</beans>
配置springmvc的三个核心:处理器、适配器、视图解析器。由于也用注解,所以也要扫包,至于用属性文件是因为为了方便配置,至于为啥写到这,是因为是在web层用的。其中还配置了一个防止静态资源无法加载的标签。
(6)web.xml
<?xml version="1.0" encoding="UTF-8"?>
<web-app xmlns:xsi="http://www.w3.org/2001/XMLSchema-instance" xmlns="http://java.sun.com/xml/ns/javaee" xsi:schemaLocation="http://java.sun.com/xml/ns/javaee http://java.sun.com/xml/ns/javaee/web-app_2_5.xsd" id="WebApp_ID" version="2.5">
  <display-name>SSM</display-name>
  <welcome-file-list>
<welcome-file>index.html</welcome-file>
<welcome-file>index.htm</welcome-file>
<welcome-file>index.jsp</welcome-file>
<welcome-file>default.html</welcome-file>
<welcome-file>default.htm</welcome-file>
<welcome-file>default.jsp</welcome-file>
  </welcome-file-list>
      <!-- 配置spring -->
<context-param>
    <param-name>contextConfigLocation</param-name>
    <param-value>classpath:spring/applicationContext-*.xml</param-value>
</context-param>

<!-- 配置监听器加载spring -->
<listener>
    <listener-class>org.springframework.web.context.ContextLoaderListener</listener-class>
</listener>

<!-- 配置过滤器,解决post的乱码问题 -->
<filter>
    <filter-name>encoding</filter-name>    <filter-class>org.springframework.web.filter.CharacterEncodingFilter</filter-class>
</filter>
<filter-mapping>
    <filter-name>encoding</filter-name>
    <url-pattern>/*</url-pattern>
</filter-mapping>

<!-- 配置SpringMVC -->
<servlet>
    <servlet-name>ssm</servlet-name>
    <servlet-class>org.springframework.web.servlet.DispatcherServlet</servlet-class>
    <init-param>
        <param-name>contextConfigLocation</param-name>
        <param-value>classpath:spring/springmvc.xml</param-value>
    </init-param>
    <!-- 配置springmvc什么时候启动,参数必须为整数 -->
    <!-- 如果为0或者大于0,则springMVC随着容器启动而启动 -->
    <!-- 如果小于0,则在第一次请求进来的时候启动 -->
    <load-on-startup>1</load-on-startup>
</servlet>
<servlet-mapping>
    <servlet-name>ssm</servlet-name>
    <!-- 所有的请求都进入springMVC -->
    <url-pattern>/</url-pattern>
</servlet-mapping>

</web-app>
加载spring配置文件,配置spring监听器,配置springmvc拦截器,配置过滤器解决乱码问题。
(7)jdbc.properties
jdbc.driverClass=com.mysql.jdbc.Driver
    jdbc.url=jdbc:mysql:///ssm?characterEncoding=utf-8
jdbc.username=root
jdbc.password=root
(8)crm.properties
customer_from_type=002
customer_industry_type=001
customer_level_type=006
(9)log4j.properties
# Global logging configuration
log4j.rootLogger=DEBUG, stdout
# Console output...
log4j.appender.stdout=org.apache.log4j.ConsoleAppender
log4j.appender.stdout.layout=org.apache.log4j.PatternLayout
log4j.appender.stdout.layout.ConversionPattern=%5p [%t] - %m%n
四、代码
(1)实体
package pers.zx.ssm.domain;

public class BaseDict {
private String dict_id;
private String dict_type_code;
private String dict_type_name;
private String dict_item_name;
private String dict_item_code;
private Integer dict_sort;
private String dict_enable;
private String dict_memo;
public String getDict_id() {
    return dict_id;
}
public void setDict_id(String dict_id) {
    this.dict_id = dict_id;
}
public String getDict_type_code() {
    return dict_type_code;
}
public void setDict_type_code(String dict_type_code) {
    this.dict_type_code = dict_type_code;
}
public String getDict_type_name() {
    return dict_type_name;
}
public void setDict_type_name(String dict_type_name) {
    this.dict_type_name = dict_type_name;
}
public String getDict_item_name() {
    return dict_item_name;
}
public void setDict_item_name(String dict_item_name) {
    this.dict_item_name = dict_item_name;
}
public String getDict_item_code() {
    return dict_item_code;
}
public void setDict_item_code(String dict_item_code) {
    this.dict_item_code = dict_item_code;
}
public Integer getDict_sort() {
    return dict_sort;
}
public void setDict_sort(Integer dict_sort) {
    this.dict_sort = dict_sort;
}
public String getDict_enable() {
    return dict_enable;
}
public void setDict_enable(String dict_enable) {
    this.dict_enable = dict_enable;
}
public String getDict_memo() {
    return dict_memo;
}
public void setDict_memo(String dict_memo) {
    this.dict_memo = dict_memo;
}


}
(2)mapper
接口
public interface BaseDictMapper {

List<BaseDict> getBaseDictByCode(String code);
}
映射
<?xml version="1.0" encoding="UTF-8" ?>
<!DOCTYPE mapper
PUBLIC "-//mybatis.org//DTD Mapper 3.0//EN"
"http://mybatis.org/dtd/mybatis-3-mapper.dtd">
<mapper namespace="pers.zx.ssm.mapper.BaseDictMapper">
    <select id="getBaseDictByCode" parameterType="string" resultType="basedict">
    SELECT
      `dict_id`,
      `dict_type_code`,
      `dict_type_name`,
      `dict_item_name`,
      `dict_item_code`,
      `dict_sort`,
      `dict_enable`,
      `dict_memo`
    FROM `base_dict`
    WHERE dict_type_code = #{code}
</select>

</mapper>
(3)service
接口
public interface BaseDictService {

List<BaseDict> getBaseDictByCode(String code);
}
实现类
@Service
public class BaseDictServiceImpl implements BaseDictService {

@Autowired
private BaseDictMapper baseDictMapper;//注入BaseDictMapper
public List<BaseDict> getBaseDictByCode(String code) {

    return baseDictMapper.getBaseDictByCode(code);
}

}
(4)web(Controller)
@Controller
@RequestMapping("customer")
public class CustomerController {

@Autowired
private BaseDictService baseDictService;
@Autowired
private CustomerService customerService;
@Value("${customer_from_type}")
private String customer_from_type;

@Value("${customer_industry_type}")
private String customer_industry_type;

@Value("${customer_level_type}")
private String customer_level_type;

@RequestMapping("list")
public String list(Model model,QueryVo vo) {
    // 查询来源
            List<BaseDict> fromType = baseDictService.getBaseDictByCode(customer_from_type);
            // 查询行业
            List<BaseDict> industryType = baseDictService.getBaseDictByCode(customer_industry_type);
            // 查询级别
            List<BaseDict> levelType = baseDictService.getBaseDictByCode(customer_level_type);

            // 设置数据模型返回
            model.addAttribute("fromType", fromType);
            model.addAttribute("industryType", industryType);
            model.addAttribute("levelType", levelType);
            //跟据查询条件分页查询用户列表
            Page<Customer> page = customerService.getCustomerByQueryVo(vo);

            //设置分页数返回
            model.addAttribute("page", page);

            //返回查询条件
            model.addAttribute("vo", vo);
    return "customer";
}
}
五、小结
这里用的是注解的方式+xml的方式。其中配置spring的配置文件的方式有些类似于分模块开发的ssh。但也要注意一些细节,比如web.xml的配置不同,因为struts和springmvc不同。


